
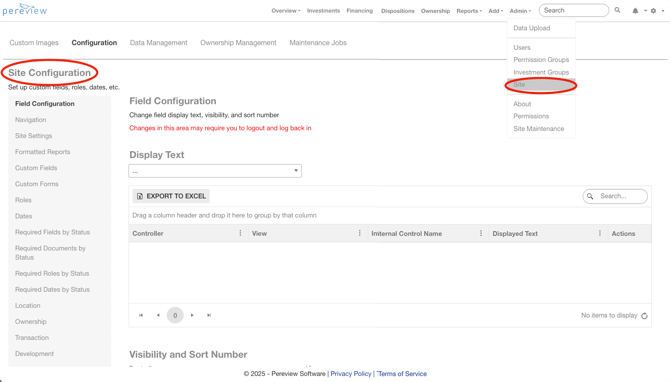
Log in, navigate to Admin on the menu bar, and click “Site” on the dropdown.
Site Configuration Description
The Site section within the Admin console is divided into four sub-sections: Custom Images, Site Configuration, Data Management, and Ownership Management.
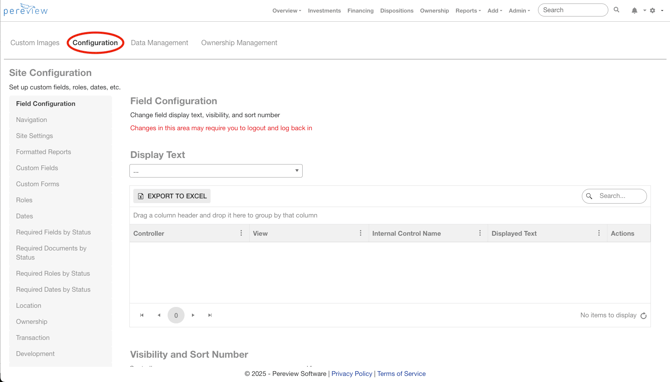
This article will focus on the Site Configuration area, which contains key settings that influence core functions like navigation and overall configuration within Pereview.
On the left-hand panel of this page, you’ll see:
- Field Configuration – Display Text: This grid enables users to customize the display text of various fields within the application. To modify a field's display text, select the desired field from the dropdown menu, then click the pencil icon in the Actions column to update the corresponding Displayed Text as it appears throughout the application. For assistance with updating these fields, please contact our Support team at Support@PereviewSoftware.com.
- Navigation – This page allows users to update the display text, sort order, and visibility of specific tab headers throughout Pereview, including:
- Sub Navigation changes the map to the menu bar that appears based on the selected tab type within each investment page. An example from the Assets section is shown below.
- Left Navigation changes the map to the left-hand navigation panel within the Details pages of each investment.
- Formatted Reports – This page allows users to map reports to specific folders and groups.
Please note that when a report is assigned to a specific group, access is restricted to users within that group only. Users who are not members of the assigned group will be unable to run or view the report.
- Custom Fields – This page allows you to add your own fields to defined areas within Pereview. You have a variety of control types for formatting (such as labels and line dividers) and data types (such as text, numbers, lists, and contacts). The custom fields will display under General Information or the Details for a given scope. For custom fields created under Asset or Transaction Properties, users also have the option to configure the Property Type under which the field will be displayed.
- Note: Once a custom field has been saved and/or has a value entered, its Control Type cannot be changed on the configuration page.
- Custom Forms – This page enables users to create and set up custom data entry forms, which will appear within the corresponding area of Pereview such as Asset Details. Please note that the custom form will only be displayed if the "Is Visible" option is selected on the configuration page. Learn more about Custom Forms here.
- Roles – From this page, specific Roles can be configured for each function within Pereview and optionally marked as required. For instance, creating a required Accountant role for your assets will REQUIRE that an Accountant be assigned to the asset before any changes can be saved.
- Dates – This page contains configuration settings for adding and managing various date types tracked within the application, such as Closing, Development, and Inspection Dates. Each date type is organized according to the specific investment type under which it is being tracked.
- Requirements by Status – These configuration pages allow Fields, Documents, Roles, and Dates to be designated as required, contingent upon the selected status of the investment type.
- Location – This page houses all City, Country, County, and MSA metrics, and allows users to configure them for Investment location fields.
- Ownership - This page enables users to add, edit, delete, and reorder how different Ownership elements are displayed in Pereview. Ownership Layouts represent different groupings of widgets organized by layout type. To add a new layout, please contact our Support team — otherwise, a blank widget will appear on the Ownership page until your desired widgets are configured and mapped.
- Transaction – This page contains the various parameters for the list of options shown when modeling a Transaction. The main focal points on this page include:
- Deal Status
-
- Can Delete? – Selecting this checkbox enables users to delete assets depending on their status.
-
-
- Note: After making your changes, you may want to consider unchecking this box to prevent unauthorized users from deleting items by mistake.
-
-
- Closed Status? – If this box is checked, a transaction can be turned into an Asset. As a reminder, a property and an ownership must exist, and the transaction’s deal status must be set to Closed for the transaction to be converted into an Asset.
-
- Dead Status? – If an investment is in Closed status, checking this box will disable the investment from showing up on certain reports.
-
- Read Only? – When this box is checked, no edits can be made while the investment is in the corresponding status.
- Valid for Loan? – Checking this box allows for an equity or debt loan to be mapped to the Transaction. If the box is unchecked, the Loan tab will not be visible, and users will be unable to add any financing.
- Investment Type – Here users can add, delete, and change the sort order of various investment types that have been added. Check the Is Equity? Box to indicate loan types for which your company is the Lender. Check the Valid for Loan box to indicate investments that are eligible for loans.
- Property Layouts and Property Types 2 and 3 function the same as Ownership layouts, in that they enable users to add, edit, delete, and reorder various elements These also require you to contact our Support team to have your desired widgets and/or metrics mapped.
- Comment Types drive to the Comments section of the Details page of each Transaction.
- Note: This also applies to Comment Types added in the Ownership, Development, Asset, Financing and Disposition configuration pages.
For assistance with any remaining grids on this page, please contact our Support team at Support@PereviewSoftware.com.
- Development – This page allows users to add and remove dropdown options that track Development Phases, Status Types, and Comment Types.
- Asset – This page contains the various parameters for dropdowns and modifying list options that are applied when modeling an Asset.
- Tenant Lease – This page allows users to configure all settings related to Tenant Leases that have been mapped to Assets.
- Financing – The Financing page contains the various dropdown controls and list options that are applied when a loan is added to the application.
- Disposition – From this page, users can add, remove, and hide Disposition stages, Buyer statuses, Comment Types, and more.
- Chart of Accounts – This page houses the Chart of Accounts and allows the user to view and configure all accounts set up within the application. This section cannot be left empty, as it enables the population of income statements, balance sheets, and supports metric mapping. To disable an account from driving to metrics and reports, uncheck the Active box. If it should not be calculated on the GL ledger, uncheck the GL? box.
- Property Management Company – This page allows users to add third-party operators and associate their asset identifiers and chart of accounts to their respective investments. Please note that each property management company MUST be added to the Property Management Company grid at the top of the page in order to be available for selection in subsequent sections. Main focal points on this page include:
- PMC Property IDs refer to the accounting codes that PMCs assign to their assets.
- The PMC to Asset Mapping grid allows users to associate Property IDs adopted by PMCs to the Accounting ID(s) set in Pereview. Please note that this has to be done manually with each asset.
- The PMC to Chart of Accounts Mapping grid allows for the mapping of a PMC’s Chart of Accounts to the Chart of Accounts that has been loaded in Pereview for the client. If this is being done manually, the Chart of Accounts will have to be set up first. If being done via upload, the upload will map it automatically.
- PMC to User Mapping - If a user login has been created in Pereview and has been tagged to the Is PMC External Group, they can be mapped within this grid. This feature is important, as it ensures that users can, and only, have access to assets for their respective PMCs.
- Variance Portal – This area enables users to create thresholds and rules for the various variance portal amounts and percentages.
- Notifications – This section allows users to configure rules and settings for system notifications, including notification type, triggers, frequency, and content. Notifications can also be assigned to specific user roles from this page.
- Financial Models – This page simply contains all financial models currently uploaded to the system. To upload a new model, please contact our support team at Support@PereviewSoftware.com.
- COA Metrics – This page displays and enables users to refresh all metrics linked to the uploaded Chart of Accounts. Checking the Balance? box lets the system know that the ending balance should populate on reports instead of the sum of the net change.
- Workflows – This page enables users to create and modify workflows. Note that only Super Admins are permitted to edit a workflow template once it has been marked as Active, in order to prevent modifications during active execution. Selecting a workflow opens the Workflow Details screen, which allows users to add individual statuses, add custom fields, set reminders and more. Learn more about workflows here.